jojo12

New Member

Posts:60
 |
| 01 Jul 2011 06:25 PM |
|
Just going to be setting up the icf for a full icf house and have been looking at buck options. Couple of questions
1) If using 2X12PT wood on 6" core how do you stop the warping that inevitably occurs with this wood, and secondly how do you ensure that you do not have air drafts coming through once the concrete/wood shrinks and pulls away?
2) has anyone used material like lvls for window bucks to eliminate the warping?
3) The method of placing a 2X6 inside the wall seems to minimize the warping/shrinkage air infiltration issueand reduces material cost, but the 2X6 does not completley fill the void and in one post I think Dave talked about foaming the gap. With this method I have a couple of questions 1) how do you properly brace the top plate, 2)when installing windows especially larger casement windows does the foam/gap not cause an issue with flexing or compression? I know some window manufacturers want you to install the window directly on wood because of compression concerns.
Without going to expensive premade systems please provide your best experiences. I would like to stay with wood and avoid vinyl for various reasons. Also any thoughts on bucking the doors or the best way to install doors would be appreciated. Are most people getting extended jams and having the door installed to the inner surface of the icf or other.
I have read other window buck posts but have not found them answering some of the questions posted, unless I missed them
Thanks
|
|
|
|
|
|
|
jonr

Senior Member
Posts:5341
|
| 01 Jul 2011 07:28 PM |
|
I don't know the answer, but wood seems like a poor choice. Warps, holds water, not a great insulator. Perhaps Styrofoam SIS? |
|
|
|
|
ICFHybrid

Veteran Member
Posts:3039
|
| 01 Jul 2011 10:43 PM |
|
Are most people getting extended jams If you have a good finish carpenter, it is probably best to let him do all the jamb extensions so everything matches up nicely. Conveniently, the window company upcharge for the jamb extensions is usually more than enough to cover the cost of doing it local. |
|
|
|
|
arkie6
Veteran Member
Posts:1453
|
| 01 Jul 2011 11:26 PM |
|
With a 6" core ICF, use a treated 2x8 that is ripped down to the full 6" width to inset into the ICF. Secure the ICF to the treated buck with 3.5" screws and 2" plastic stucco washers every 8". Use the pieces that you ripped off the 2x8 in the bottom of the window buck (one on each side with a ~3.5" gap in the middle) to allow you to pour under the window. Screw coated or galvanized 3" screws ~ half way into the treated buck every 8" on the back side to lock it into the concrete once cured. If you need your windows to be up against solid wood, make your bucks 1.5" wider and taller than necessary, then line the inside of the bucks with ripped 3/4" plywood after the pour is completed. I would still use 3.5" screws through the window flanges to secure them to the 2x treated lumber behind the foam. |
|
|
|
|
jojo12
New Member
Posts:60
|
| 03 Jul 2011 12:00 AM |
|
what is better using a 2X6 and cutting 1/2" PT plywood and attaching it to the 2X6 to make a full 6" board, or ripping a 2X8. Is there any disadvantage to attaching plywood to the 2X6? |
|
|
|
|
Peter Jackson
New Member
Posts:29
|
| 06 Jul 2011 12:40 AM |
|
Based on all the discussions I've seen on this topic in this forum and my discussions with my very experienced ICF installer, I don't believe there is a slam-dunk solution to this that doesn't cost a fortune. What I opted for for was slightly oversize window openings with PT cut-down 2x8 bucks which were then screwed in good to the green concrete post-pour, and then lined on the inside with two layers of framing grade non-PT 2x6. With 12" walls, my windows are obviously inset. It's been a year, and they all still open and close :)
Next time I'll probably experiment with nailable aerated autoclaved concrete "boards." |
|
|
|
|
ICFHybrid
Veteran Member
Posts:3039
|
| 06 Jul 2011 09:21 AM |
|
PT cut-down 2x8 bucks which were then screwed in good to the green concrete post-pour, Is there a fastener for use in uncured or "green" concrete? What about good "old fashioned" 316 stainless ring shank nails in the backside of the buck so as to grip both wood and concrete after the pour? 6" nails are usually recommended, but even a four inch nail gives you more than 2-1/2" of concrete embedment, which would seem to be enough. That oughta stop the localized shrinkage issues. |
|
|
|
|
Peter Jackson
New Member
Posts:29
|
| 06 Jul 2011 04:37 PM |
|
I believe my installer used 3 1/2" Teflon coated concrete screws. They zipped right in. |
|
|
|
|
jeepster

Basic Member
Posts:153
|
| 12 Jul 2011 09:49 PM |
|
I'm in the process of building 24 window/door bucks at the moment. I'm debating in my mind about the best method for anchoring into the concrete. I used 5/16 stainless steel lag bolts in the first pour, but it got me thinking. If the wood/concrete shrink and pull slightly away from each other, there nothing I can do, aside from spray foam/caulk.
I know I won't have enough ss lags to complete the 24 bucks that I'm building right now. Of course I can always get more, but this topic has got me thinking. I'm wondering if using hot-dipped galvanized nails isn't the best thing. The reason why -- is if there was ever any shrinkage gap or even a need to remove the buck for some reason, you would still be able to move it against the shank of the nail. The head of the nail would be embedded in concrete, so it won't be able to go anywhere, but the shank could still allow the buck to move if necessary. For example, if there was enough shrinkage to cause concern, a tap-con could draw the board back up to the concrete. But, if you put screws/lags from the backside, you would never be able to make that board move because of the threads.
On the flip-side. I think some of this depends on how wet the pt lumber is and how long it had a chance to dry before the pour. Most of my 2x12s measured out at 11-1/2" when I bought them, and they shrunk to between 11-1/8 and 11-1/4 by the time I poured the concrete. If one had time and space, I think it would be a good idea to purchase the pt lumber a few weeks ahead of time, sticker them in a shaded garage/shop, and blow some air across them to help them dry. Buy more than you need and return the ones that warp badly. |
|
|
|
|
dmaceld
Veteran Member
Posts:1465

|
| 13 Jul 2011 12:30 AM |
|
Posted By jeepster on 12 Jul 2011 09:49 PM
I'm in the process of building 24 window/door bucks at the moment. I'm debating in my mind about the best method for anchoring into the concrete. I used 5/16 stainless steel lag bolts in the first pour, but it got me thinking. If the wood/concrete shrink and pull slightly away from each other, there nothing I can do, aside from spray foam/caulk.
I addressed that concern in two ways, one for windows and one for doors. The first two pics show window bucks which I put inside the foam. I used untreated 2x6 douglas fir to minimize warping, but there still was some. The 1/2" gap was easy to fill in with spray foam and once set was plenty solid. I stapled blue sill seal foam to the backsides to minimize any concrete/wood contact, and to help keep the space filled after shrinkage. But a gap between buck and concrete wasn't an issue on the window bucks because they were inside the ICF block. 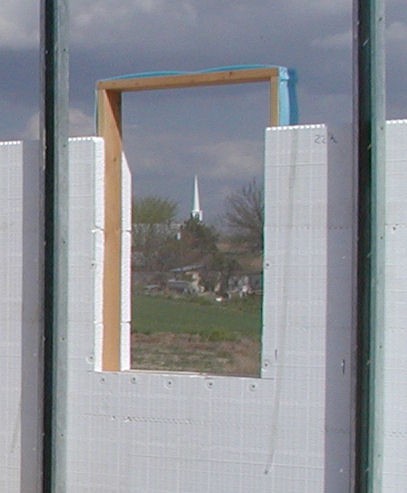 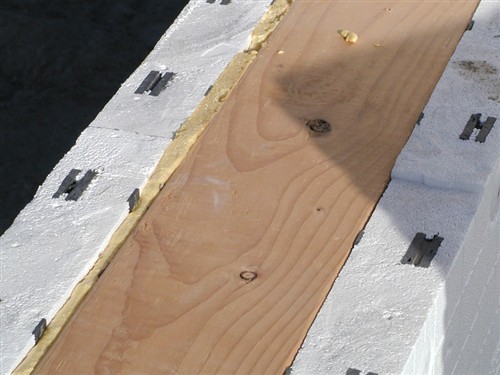 On the door buck, which also is DF and 11" wide spanning the full width of the ICF block, I put wider strips of sill seal foam that were about 2" wider on each side than the buck. These were folded in against the inside of the ICF while putting the buck into place. This foam does two things, it keeps the concrete from contacting the wood, and the folded foam created a reasonably tight seal for whatever gap came from shrinkage. Did they stay in place against the ICF when the concrete was poured? I don't know, but I didn't see any concrete leakage between the ICF and the door bucks so I'm pretty sure they did.  To anchor the bucks to the concrete I drove 6" ring shank nails through the bucks after they were all in place and all the ICF blocks were stacked. Once the concrete was poured all the bucks were in their place permanently. I had no intention and made no provision to adjust them afterward. |
|
| Even a retired engineer can build a house successfully w/ GBT help! |
|
|
smartwall
Veteran Member
Posts:1209
|
| 13 Jul 2011 09:39 AM |
|
I'm with dmaceld on this one. No pt in above ground windows for my jobs. |
|
|
|
|
arkie6
Veteran Member
Posts:1453
|
| 13 Jul 2011 02:28 PM |
|
I used pressure treated pine for my walkout basement window and door bucks, but will probably use untreated lumber on the main floor and just install a vapor barrier between the wood and concrete. I have a bunch of leftover FastFoot fabric that I wrapped and stapled to my basement bucks and will use the same as a vapor barrier for the main floor bucks.
My wood bucks are inset into the ICF and I used 3.5" screws and 2" EIFS plastic washers every 8" to secure the foam to the bucks. I used exterior rated ceramic coated 3" deck screws screwed ~1.5" into the backside of the bucks staggered every 8" to lock the wood buck to the concrete. |
|
|
|
|
Lilly of this valley
New Member
Posts:6
|
| 17 Jul 2011 05:31 PM |
|
Have you looked at the Polycrete ICF forms they can give you what ever concrete core thickness you want if it is a PT 2x6 buck the standard form is 5.5/8" Makes a nice tight fit. I swear by this form, not seen one better and more job friendly. |
|
|
|
|
LorinF
New Member
Posts:2
|
| 16 Mar 2012 01:31 PM |
|
Hello Peter J, Your comment is well received as this is the material "AAC" I have been testing and evaluating in my developing a good-to-best bucking product. Did you get that chance to trial it yet?
My product is called True-Buck. I have recently performed my first product install of three window shapes in Wimberly, TX via Jeff Cunningham of Round Rock with promising results. Following Spring Break the scaffolds will be removed and finished photos taken. More to follow.
This is my initial post after spending most of yesterday reading here about all your buck issues and discussions.
My only request at this time from this group is for any to share a photo or two of their own actual buck problems, at all stages of construction. With thanks, Lorin |
|
|
|
|
Alton
Veteran Member
Posts:2164
|
| 17 Mar 2012 05:48 PM |
|
Lorin,
Can you attach pictures to show the True-Buck? What material is used to make the buck? |
|
Residential Designer &
Construction Technology Consultant -- E-mail: Alton at Auburn dot Edu Use email format with @ and period .
334 826-3979 |
|
|
LorinF
New Member
Posts:2
|
| 17 Mar 2012 07:56 PM |
|
Hi Alton, Here is one shot of two prototypes using 2" AAC, Autoclaved Aerated Concrete. I have another image that has a cut-out of the Quadlock EPS showing the tightness of the joint. I have found the concrete bonds beautifully with the AAC. This will be in my next post. |
|
|
|
|
Alton
Veteran Member
Posts:2164
|
| 17 Mar 2012 09:25 PM |
|
I believe the picture failed to take. I do not see any pictures or attachments. Would mind using my e-mail address below to send me what you have dealing with the window bucks. |
|
Residential Designer &
Construction Technology Consultant -- E-mail: Alton at Auburn dot Edu Use email format with @ and period .
334 826-3979 |
|
|
peteinny
New Member
Posts:85
|
| 17 Mar 2012 09:41 PM |
|
I have hear of some installers using VBUCK. No wood involved. |
|
|
|
|
robinnc

Advanced Member
Posts:586
|
| 17 Mar 2012 10:16 PM |
|
Isn't VBUCK very expensive to use? |
|
|
|
|
Speed
New Member
Posts:9
|
| 20 Mar 2012 02:39 PM |
|
Our installer used vbuck. The difference between vbuck and pressure treaded lumber wasn't much (so little that I don't remember the actual numbers). The nice thing about it is nothing on your exterial walls will rot with vbuck. |
|
|
|
|